
Installation Instructions
Product Information
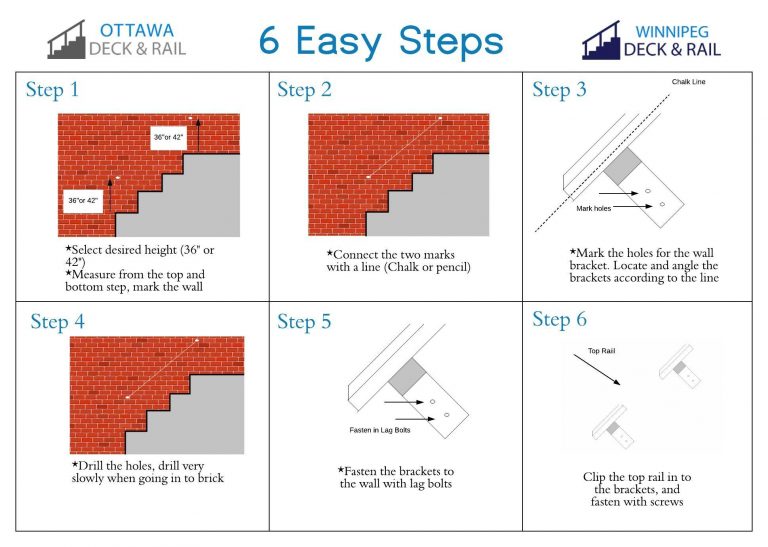
Check out our 6 easy step guides to install your aluminum railing systems. Select your railing type:
Picket Railing
Picket Railing (42" and 36")
Materials needed:
- Two (2) End Posts
- 6 ft of Top/Bottom Rail
- One (1 )Pack Pickets/Spacers
- Eight (8) 3” lag bolts
- Two (2) 1.5” screws
- Two (2) ¾” screws
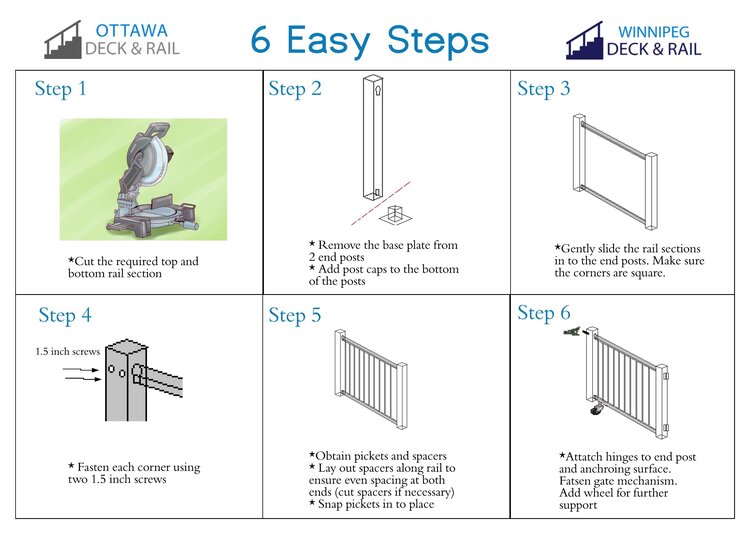
1. Place one End Post near the edge of your deck, so that the lag bolts will secure the post to adequate blocking/support. Square the post with the edge of the deck, and mark the holes using a pencil.
2. Pre-drill the holes using a 3/16” drill-bit
3. Fasten the post to the deck. Do not tighten the lag bolts all the way.
4. Repeat steps 1-3 for the remaining End Post
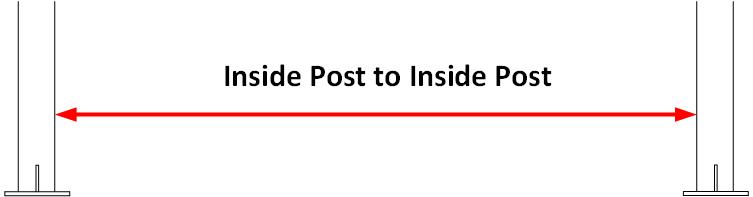
5. Measure the distance between your two posts, from the inside edge of the post, NOT the baseplate.
6. Add 2.5” to your measurement, and cut the Top and Bottom Rail to that length. Insert the rail into the slots in the End Posts.
7. Check if your posts are level. If not, level with shims. Then, tighten the lag bolts.
8. Use two 1.5” screws (1 per side) on the inside of the bottom rail or outside of the post to prevent the bottom rail from moving.

9. Snap the spacers on to the Bottom Rail, starting with a flat end at one side and working across to the other side. Center the spacers so that there is equal spacing on each side.

10. Measure the distance between the post and the flat end of the spacer (Length X). Add 5/16″ to that measurement, and cut two spacers to that length.
11. Starting with your newly cut spacers on the Top and the Bottom Rails, insert pickets and add spacers to the Top Rail.
For 36″ railings, cut 6″ off the pickets
12. Measure the distance between the bottom of the last picket and inside edge of the End Post, and cut two spacers to that length.
13. Snap the final spacers into place on the Top and Bottom Rail.
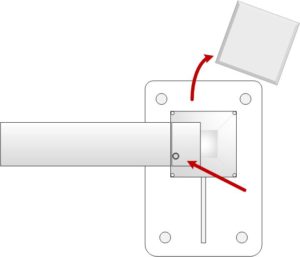
14. Gently remove the Post Caps from the End Posts, and use two (2) 3/4” screws to secure the Top Rail inside the End Posts.
Glass Railing
Glass Railing
Materials needed:
- Two (2) End Posts
- A section of Top and Bottom Rail
- Glass Channel (2) and Glass Blocks (2)
- Eight (8) 3” lag bolts
- Two (2) 1.5” screws
- Two (2) ¾” screws
1. Place one End Post near the edge of your deck, so that the lag bolts will secure the post to adequate blocking/support. Square the post with the edge of the deck, and mark the holes using a pencil.
2. Pre-drill the holes using a 3/16” drill-bit
3. Fasten the post to the deck. Do not tighten the lag bolts all the way.
4. Repeat steps 1-3 for the remaining End Post
5. Measure the distance between your two posts, from the inside edge of the post, NOT the baseplate.
6. Add 2.5” to your measurement, and cut the Top and Bottom Rail to that length. Remove the plastic channel from the Top and Bottom Rails, then discard. Insert the rail into the slots in the End Posts.
7. Check if your posts are level. If not, level with shims. Then, tighten the lag bolts.
8. Use two 1.5” screws (1 per side) on the inside of the bottom rail or outside of the post to prevent the bottom rail from moving.
9. Measure the distance between your two posts, from the inside edge of the post, NOT the baseplate. Check to see if that measurement is the same at the top and the bottom of the post. (If the top is wider/narrower, fix that in the next step.)
10. Gently remove the Post Caps from the End Posts, and use two (2) 3/4” screws to secure the Top Rail inside the End Posts.
11. Cut two pieces of Rubber Glass Channel to fit inside your Top and Bottom Rail. Insert two Glass Blocks in the bottom rail, about 4” from each post.
12. To measure the glass, measure from the inside of the post to the inside of the post, and remove 3 inches. This will be the width of the glass. The height of the glass will be 35 3/8″ for 42″ Railings.
For 36″ railings, the height of the glass will sometimes vary. To measure the height, measure vertically between the bottom and top rail. Add 7/8″ to your measurement, so that the glass can fit inside the rails. Ensure that your glass channel is installed when performing this step.
13. Submit the glass measurements to the sales associate so that they can place the glass order. Please be clear with the glass sizes and remind the associate the style of glass you have ordered.
Example:
- Glass Type: Clear Glass
- 2 pcs - 47" x 35 3/8"
- 3 pcs - 40" x 35 3/8"
- 1 pcs - 30" x 35 3/8"
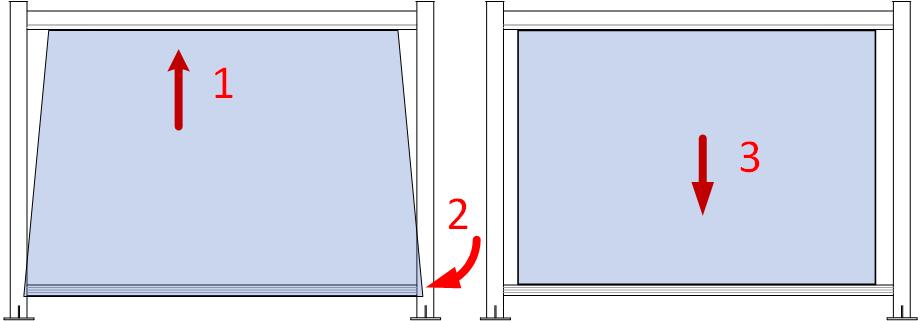
14. Once the glass is received, gently push the glass panel up into the Top Rail, then guide it in line with the Bottom Rail and then push it down into the Bottom rail so that it sits on the glass blocks.
Stair Railing
Stair Railing
Materials needed:
- Two (2) Stair Posts
- A section of Top and Bottom Rail
- A pack of Pickets
- A pack of Stair Spacers
- Eight (8) 3” lag bolts
- Six (6) 1.5” screws
- Eight (8) ¾” screws
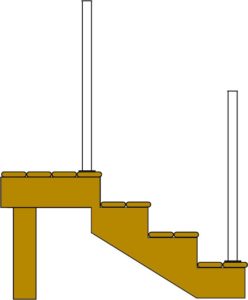
1.Place one Stair Post near the edge of your bottom step, so that the lag bolts will secure the post to adequate blocking/support. Square the post with the edge of the surface, and mark the holes using a pencil.
2. Pre-drill the holes using a 3/16” drill-bit
3. Fasten the post to the step. Do not tighten the lag bolts all the way.
4. Repeat steps 1-3 for the remaining Stair Post, ensuring that the two posts are in line with each other.
5. Check if your posts are level. If not, level with shims. Then, tighten the lag bolts.
6. Cut a section of Top and Bottom rail to extend past your posts when laid on the stairs
7. Lay the Bottom Rail on the stairs, so that it sits against (beside) your stair posts. Mark the angles to cut with a pencil. Do the same for the Top Rail.
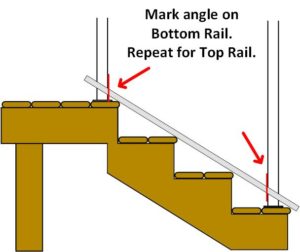
8. Cut the top and bottom rail at desired angle(s)
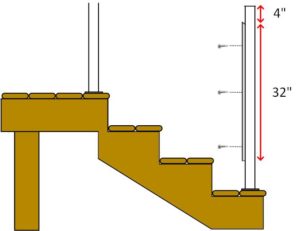
9. With your mitre saw at a 35 degree angle, cut two (2) pickets to 32” in length. Only make one angled-cut per picket.
10. Make a pencil mark 4” from the top of the bottom Stair Post. Clamp one picket in that position, and attach to the post with three (3) 1.5” screws.
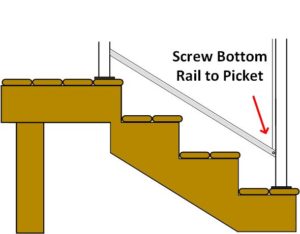
11. Attach the bottom rail to this picket with two (2) 3/4″ screws, so that the other end of the rail is flush against the top Stair Post.
12. Insert the other cut picket (cut end up) and clamp to the top Stair Post. Attach the picket to the post with three (3) 1.5” screws. Do not attach the bottom rail to this picket.

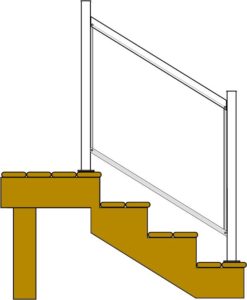
13. Place the top rail on both pickets.
14. Use two (2) 3/4″ screws to fasten the top rail to the upper picket, then to the lower picket. Make any necessary adjustments to ensure the railing is flush with the posts.
15. Attach the Bottom Rail to the upper picket.
16. Snap the Stair Spacers on to the Bottom Rail, starting with a flat end at the bottom and working up to the top. Center the spacers so that there is equal spacing on each side.

17. Measure the distance between the mounted picket and the flat end of the spacer. Add 5/16″ to that measurement, and cut two spacers to that length.
18. With your mitre saw at a 35 degree angle, cut the required number of pickets to 32” in length.
20. Starting with your newly cut spacers on the Top and the Bottom Rails, insert pickets and add spacers to the Top Rail

21. Measure the distance between the bottom of the last picket and inside edge of the top Stair Post, and cut two spacers to that length.
22. Snap the final spacers into place on the Top and Bottom Rail.
Blocking
Blocking
Materials needed:
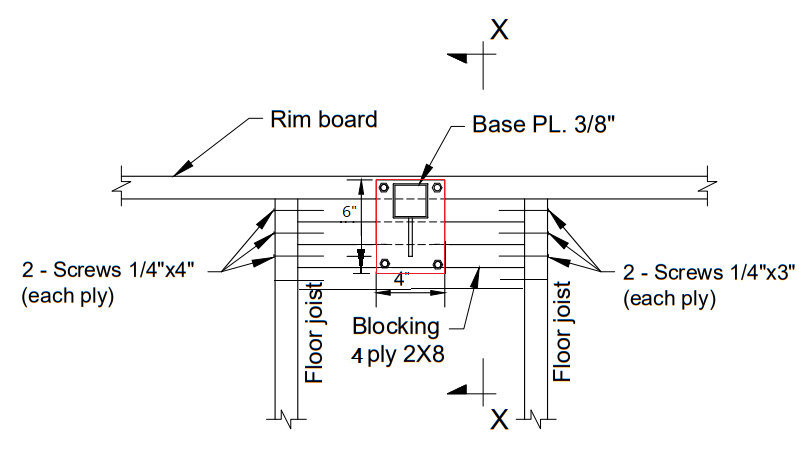
- 2 x 10 or 2 x 8 Pressure Treated Wood
- 4″ Wood screws
1. Measure the dimensions of the deck with a tape measure. Next, find the post locations. Start by marking where the corner and end posts will be on the deck. For the middle posts, determine if the side length is longer than the maximum span for your type of railing (6ft for picket railing, 5ft for glass railing). Add middle posts such that the sections will be equal, but will not exceed the maximum recommended railing length.
Example: (Picket Railing, Maximum Length = 6ft)
– 5ft Side – No middle post required, 7ft Side – 1 middle post required
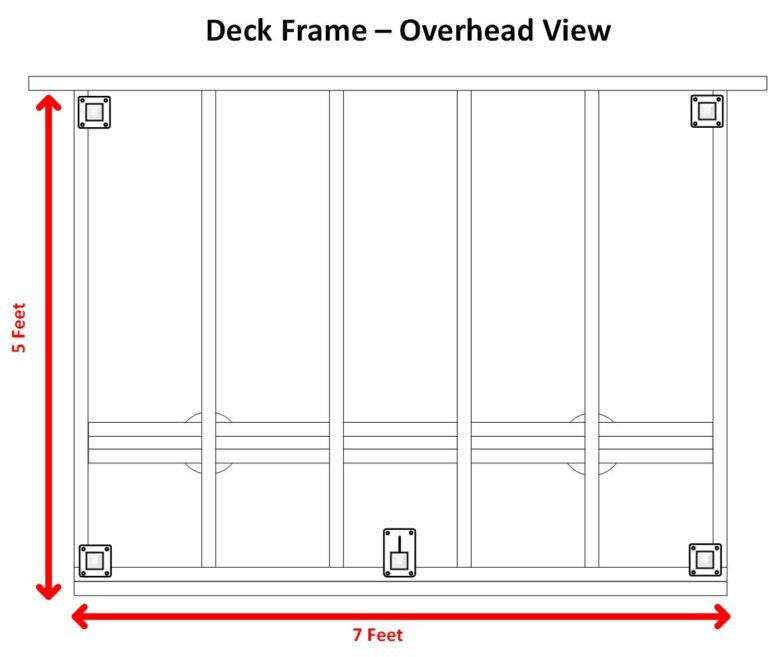
2. Next, cut sections of 2 x 8 to fit between the joists of the deck. Place them flat against the rim joist and screw them in from the sides using wood screws.
3. Once blocking is installed, deck boards can then be installed, so that the railing posts can be installed on top of the decking.
Topless Glass Railing
Privacy Walls
Gates
Grabrails
TOOL LIST
All tools are available on amazon.ca, click to buy your tools!